It’s easy to make your own music with GarageBand! This tutorial will help you learn the basic tools for music composing in GarageBand 4, which is part of the Apple iLife ’09 package. Even if you don’t have any musical background, I think you’ll find this program to be easy to learn and a lot of fun!

Some super-quick video tutorials from Apple exist for the following topics:
- Building a Song: Recording your voice, Software Instrument vs. Real Instrument tracks, Loop Browser, cycle region, recording multiple takes
- Editing and Arranging Your Song: Region editing, track management, Arrange Regions
- Mixing Your Song: Track controls (mute, solo, gain, pan), audio effects
This tutorial will walk you through some of the main features of GarageBand by creating a 30-second song.
Create a New GarageBand Project
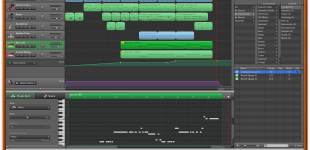
Launch GarageBand. If it immediately opens a pre-existing project, go ahead and click File Menu > New so we can start fresh. Select “Loops” as the project type and click the Choose button. Once created, you should see the GarageBand interface, with Tracks labeled on the left, the Timeline in the middle, and Browser / Info Panel on the right.
Tutorial Tasks:
- For this tutorial, create a new Loops project called firstname_lastname_gb_tutorial and click OK.

Adding Loops
To get started with our music composition, we’ll take a common route of laying down some beats and rhythm tracks first. Since I’m not much of a percussionist, I’m going to have to rely on some 2000+ free loops provided by Apple. If the Loops Browser is not already visible on the right side of the GarageBand interface, click Control Menu > Show Loops Browser to make it visible. At the top left of the Loops Browser, I clicked the Column View button. Then I started my search for some drum beats to start my song. After trying out a few by clicking on them, I found one pattern I liked here: Loops Browser > By Instruments > All Drums > Kits > Percussion Combo 03.

However, the crash cymbal in the loop makes me think it’s designed for a big finish, so I decide to use Percussion Combo 1 instead. I dragged the loop into a blank part of my project and it automatically created a new Track and even named it “Kits” to reflect the content in it. You can adjust its position by clicking and dragging the clip. To repeat the loop, you can drag new instances from the Loops Browser onto the Track, but I just used Copy and Paste to make it play the same loop 8 times in a row. I only want a 30-second song, so now I’m going to check how long the project is. Right now, my LCD panel at the bottom of GarageBand is displaying in Measures, which is a useful way to think about music. However, to see how long the song actually is, I click Control Menu > Show Time in LCD. Now when I move the playhead to the very end of the song (end of Measure 16), the LCD tells me it’s 32-seconds, which is just right. If I needed to, I could extend or shorten the Track content in order to make it end at the desired time.


Once you have a good idea how long your song is, click Control Menu > Show Measures in LCD again so that snapping is turned on, which allows you to make sure loops snap to the beat. Now that I know when my song roughly needs to end, I decide to replace the last two drum loops with Percussion Combo 03 as my big finish. I drag the new loop right on top of the old ones to replace them.
Tutorial Tasks:
- Find some loops you like and create a basic rhythm track. While you’re searching for loops, you may come across some jingles that are pretty much finished already. These are goodies from Apple that are ready to use without further editing for your future projects, but we won’t make use of them in this tutorial because the whole point is learning to generate some new music ourselves.

Working with Multiple Tracks
We have one rhythm track now, but I want to fill out some more, so now I check out the Bass section and find some “Woody Latin Bass” loops that I want to incorporate into my song, starting at Measure 3. I click and drag them to a blank part of my project, and again GarageBand automatically creates a new Track for me with “Acoustic Bass” as the name. It’s a good practice to put each “instrument” on its own track. Next, I add more loops from the “Woody Latin Bass” family to my track. You may have noticed that some of the loops are blue and some are green. For an intro about Real Instrument vs. Software Instrument tracks, check out the Building a Song video. For now, I won’t worry too much about it, but will finish my second track.
Tutorial Tasks:
- Try finding another instrument’s loops to fill out your rhythm section.

Editing Tracks
Now it’s time to add some melody lines to the composition. If you’re following along, note that I ended up using loops from the Latin Lounge Piano, 70s Ballad Piano, and Latin Horn Stabs families, as well as a Cowbell Groove. As you add more layers and complexity to your composition, you may find that the pieces don’t always fit together as nicely as you would like. There are a number of ways you can edit the clips in your project: The first is to cut and paste to rearrange the music. Since the 70s Ballad Piano 05 loop is meant to repeat, there are some notes at the end that help it join back to the beginning. However, since it’s at the end of my song, I don’t want it to play those last few notes. Instead, I select the clip in my Piano track, move the playhead to where I want to cut the clip, and click Edit Menu > Split. Now there are two pieces, and I can select the second piece and delete it. (Make sure to deselect the first piece before deleting!) Another thing I can do with tracks is apply effects and filters to alter the sound of the contents. To do this, click on a track’s leftmost icon to activate it, then make sure Track Menu > Show Track Info is enabled. From the Track Info panel, there are plenty of effects and filters to explore. If you are using a Software Instrument, you can even change the type of instrument that track is playing!


On Software Instrument tracks, you can change the actual notes in a clip by activating the Track and ensuring that Control Menu > Show Editor is enabled. Then in the Editor panel at the bottom of the interface, you can modify the length and pitch of individual notes. To add more notes, hold down the Cmd button to enable the drawing mode which will allow you to add individual notes.

Loops not enough to realize your creative vision? Play and record your own music track by clicking Track Menu > New Track. Select Real Instrument if you’re singing or recording from a microphone. Select Software Instrument if you’re using a MIDI device or want to play with the virtual piano keyboard.

To play along using the virtual keyboard, click Window Menu > Musical Typing. Your computer keyboard is now an instrument (albeit a somewhat crude one)! You can select the instrument / sound you want, practice playing along with the existing tracks, and hit the Record button to actually convert your typing into musical notes.

If you’re following along, note that using the Software Instruments features enabled me to the following tasks:
- Change the last notes of Woody Latin Bass 06 to sound more like an ending.
- Play a melody using Musical Typing on the Blip Side track.
- Copy and paste the same melody to a new Track, change the instrument used in the Track Info panel, and modify some of the notes to simplify the Circuit Dialog track.
Tutorial Tasks:
- Change the type of instrument used on a Software Instrument track by using the Track Info panel.
- Try some effects and filters on a Real Instrument track using the Track Info panel.
- Try creating your own music on a new Software Instrument track using the Musical Keyboard.
Volume Control and Mixing
You may want to change the volume of tracks so that they mix together better. There are three controls that exist for that: Overall track volume, Track Volume automation, and Master Volume. To change the overall track volume, use the slider on the track with the speaker symbols (next to the Stereo Pan control dial and below the volume meters).

To exert more fine control over the track volume over time, click the Automation button for the track to open up the Automation controls. Then turn on the Track Volume switch and add control points on the line representing the volume of the track over time. This is good for creating fade ins and fade outs for parts of the track.

To create fades for the song overall, use the Master Volume control, which is enabled by clicking Track Menu > Show Master Track. Again, add control points and adjust the line to create volume fades for the song.
Tutorial Tasks:
- Adjust the track volumes and make sure your song elements blend together well.
- Be sure your song fades out around 30-seconds using the Master Volume control.

Export File
Once you’re finished with your song, it’s time to export it. But before you export, make sure the end point has been set in the timeline. The end marker is a tiny purple triangle. Click and drag it close to the end of your song, but be careful not to cut off any actual content (including lingering echo effects). If you don’t set the end marker, the exported song will sometimes have a lot of dead silence recorded after the song ends.

Be sure to turn off the Cycle Region mode if you used it, then preview your song one last time from start to finish to make sure everything is complete, then click Share Menu > Export Song to Disk. Pick the MP3 Encoder and set it to at least “High Quality”, then click Export. In the dialog box, pick an appropriate location for the MP3 and click Save. Once it’s exported, test it one more time in your favorite MP3 player!
Tutorial Tasks:
- Set your end point to eliminate dead silence at the end of your song.
- Export your song as an MP3.

Sample File
If you want to hear how my final project sounds, click and download the file called GarageBand Song Sample to a temporary storage space on your computer. From your computer, double-click meyer_minute_podcast.zip to unpack the sample GarageBand project and MP3. Double-click the project to open it in GarageBand. Feel free to change things around in the project to create your own variation.
Next Steps
If you enjoyed this tutorial and don’t already have Apple iLife ’09, support my site by getting it and the accompanying Apple Training Series
book through here!
I need help from you as a musian egineering here solomon.islands.the only things is that can you show me the fullset of musical instrument programs
Hi Timothy, thanks for the question! I’m not really sure if I can fully answer your question. There are probably hundreds of musical instrument programs on the computer, each with their own advantages. For Macs, there’s GarageBand (part of iLife), Logic Studio, and Soundtrack Pro (part of Final Cut Studio). There’s also Ableton Live, Finale, and Sibelius, just to name a few!
Hi there, You have done a fantastic job.
I will definitely digg it and personally suggest to my friends.
I am confident they’ll be benefited from tthis website.
Thanks for “digging” this tutorial! Now, you do understand that GarageBand helps you compose amazing songs but doesn’t actually help you build garages, right?