Removing Camera Dust

We met at Lower Antelope Canyon last month and both got the photographer’s pass in the morning. What was the blower you were talking about for removing dust? Also, how do you clean your sensor?

I had a great time meeting a fellow photographer during my adventures last month in Page, Arizona, and while we were exploring Antelope Canyon, our camera gear naturally got covered with a fine layer of sand and dust. Not only did I hate that gritty feel of the particles in my lens when I turned the zoom ring, but it can do some serious damage to your gear if left in there. So one of the first tasks I attended to when I returned to my car was to perform a quick cleaning, followed by a more thorough cleaning once I got back to the hotel, since it was so incredibly dusty.

To remove typical amounts of dust and other foreign matter that lands on my camera and lenses, I usually use the Giottos rocket air blower, which is a simple but effective hand-powered blower that shoots puffs of air with a good amount of pressure. The rocket blower comes in different sizes, but I just use the large one. I will use the puffs of air very liberally across the outer surfaces of the camera and the lens to cast off dust. I’ll often do this for a lens before I put the lens cap back on.

To answer my new friend’s second question, I’ve never had the occasion to actually clean my sensor, other than to let the camera go through its automatic sensor cleaning routine when I turn the camera on and off. For the most part, I’m guessing I would do more harm than good when trying to clean my sensor manually. Instead, I try to practice the art of keeping dust out of the sensor chamber in the first place, which involves being careful to point the face of the camera downward when changing lenses, so that loose dust and particles will not just drift into the sensor chamber. If I truly suspected something was wrong with the sensor surface (such as noticing the same blemishes or dead pixels on every photo I take, even after cleaning or switching lenses, I’d probably send it in to Canon for a cleaning. Here’s a link to Canon Professional Services, which offers several levels of membership: http://www.cps.usa.canon.com/repairs/repairs.shtml

Finally, check out the photos I took at Lower Antelope Canyon. Dust or no dust, the trip was well worth it!

[sc:ask]

WordPress Nav Menu Text vs. Page Titles

How do I make the title of a WordPress page different from the text of a menu button that links to that page?

When you create a new Page in WordPress and want to add it to one of your menus, the default behavior is for the title of the page to become the text of the menu button that links to it. Many people are happy with this behavior, but occasionally you may want to customize the button text, especially if you have a very long Page title and want a shorter phrase to show up in your navigation menu. Here is a way to work at it without any plugins:

Give your page whatever title you want and give it whatever custom URL that you want. Publish your page and copy down the URL for it.

Wordpress Page with Custom URL

In the WordPress Dashboard, under Appearance > Menus, now add a Link to your navigation menu, which will require a URL as well as custom link text to display in the menu. After you fill that in, click the Add to Menu button, then click Save Menu in the Menu Structure section to commit the changes.

Wordpres Add Link to Menu

If the page was already added to the menu structure for your site, you may now have one extra button with the page title in it instead of the custom link text. If you don’t see this issue, you’re done! Otherwise, find that menu item in the Menu Structure section and click the Remove function. Remember to click Save Menu again when you’re ready.

Wordpress Menu Structure panel

Here is what the final product looked like in my test, where the “Short Title” menu button linked to the page with the long title:

Wordpress page with long title but short link text


[sc:ask]

Stray Cats Invaded Our House

About a month ago, I discovered evidence that at least one animal had infiltrated the downstairs storage areas of our house, having apparently fallen through the fiberglass insulation overhead and broken a few glass jars that were in storage. Without thinking much about it, I used a broom to stuff the insulation back in the crevice above. A day or two after the discovery, I observed a curious cat entering the same storage area by way of a cutaway hole in the paneling that allowed water pipes to enter the house. I immediately chased the cat out, and hoped that the message was clearly conveyed that this intruder was not welcome in the house.

However, I was not successful in this attempt, and over the past three weeks, neighborhood cats have been observed roaming about freely in our yard with increasing frequency, with greater numbers of distinct animals, and with increasing aggression, particularly in the evenings. Additional inspections of the two adjacent storage areas revealed repeated disturbances to the insulation and more broken glassware, which was unfortunately left in abundance on the shelves of this space by the previous residents. The past week has also been marked by the daily chasing of stray cats with a broom away from the house, followed by confirmation in the evenings that the intruders had found their way back into the house, as evidenced by the unsettling sounds of cats meowing, running about, and fighting, all emanating from the ventilation system in our living room, which is directly above the heater unit installed in the storage area. I have no doubt that the outdoor cats have found the space near our heater to be a pleasant location to hide away during a cold night, but this progression of unruly feline behavior, property damage, the growing stench cannot continue.

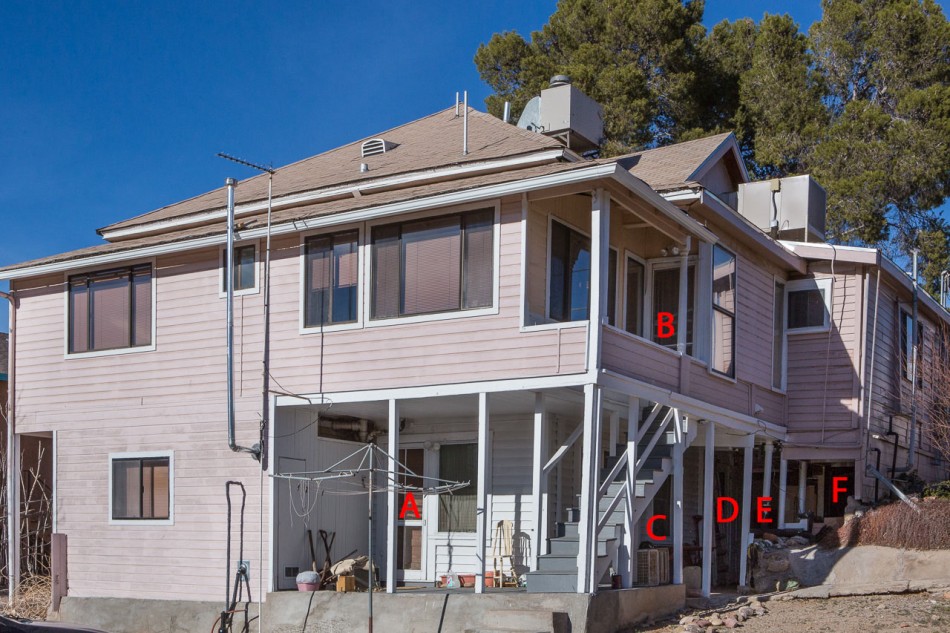
Today, I was prepared to investigate the situation in earnest, and I believe my efforts were rewarded, as today’s discoveries were the most significant to date. I have taken the opportunity document my findings through the following photos. The first photo shows the back of the house. Each photo contains labels so readers can stay oriented as they view the image series below.

A. Front door of downstairs unit.
B. Back door of upstairs unit.
C. Picnic table where stray cats like to lounge around.
D. Storage Area that contains heater and vents overhead.
E. Workshop that is behind a padlocked door.
F. Empty area under the house where stray cats like to hang out. 

House photos by Kenneth Chan Photography

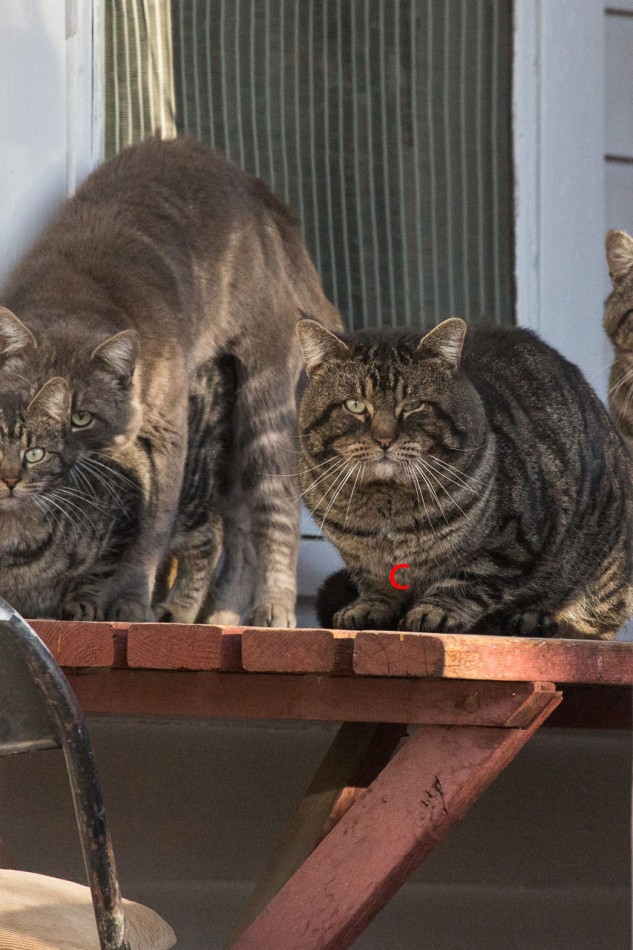
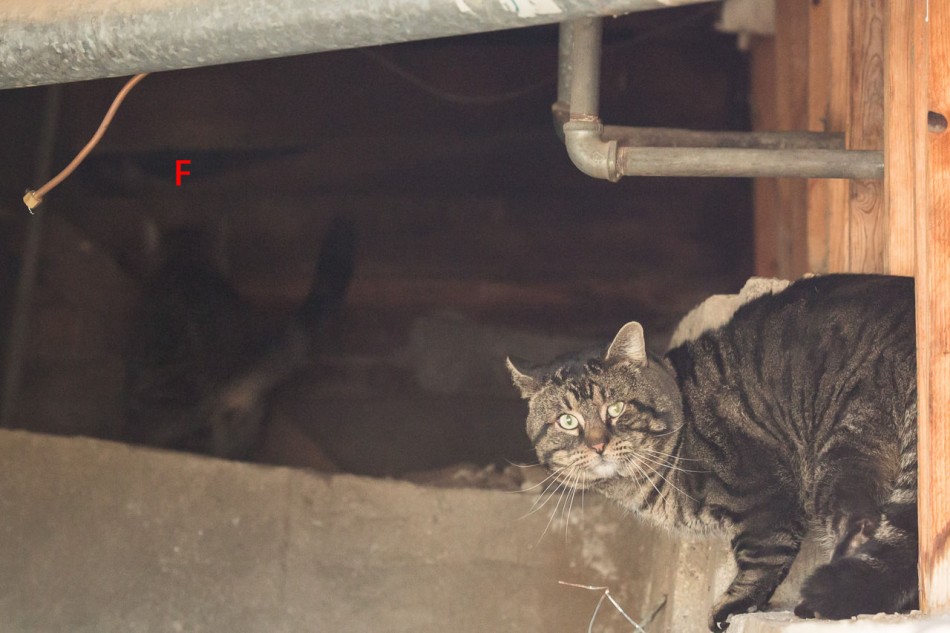
This morning, I spotted two cats on Picnic Bench C and managed to capture them with my camera. Behind them are Storage Area D & Workshop E.

Surveillance photos by Kenneth Chan Photography

I soon discovered that there were in fact more than two cats on the picnic table, and it is clear they had been expecting some privacy at this early hour.

Surveillance photos by Kenneth Chan Photography

I was surprised and annoyed by the boldness this morning, as this clowder glared at me while continuing to do their business, perhaps confident that the wooden posts between us would provide them adequate time to make a quick escape should the occasion arise.

Surveillance photos by Kenneth Chan Photography

Without further warning, three of the cats suddenly bolted away, leaving the biggest cat alone in my sights. The cat looked intently in the direction of the empty Alcove F where I have observed other cats vanish during their escape.

Surveillance photos by Kenneth Chan Photography

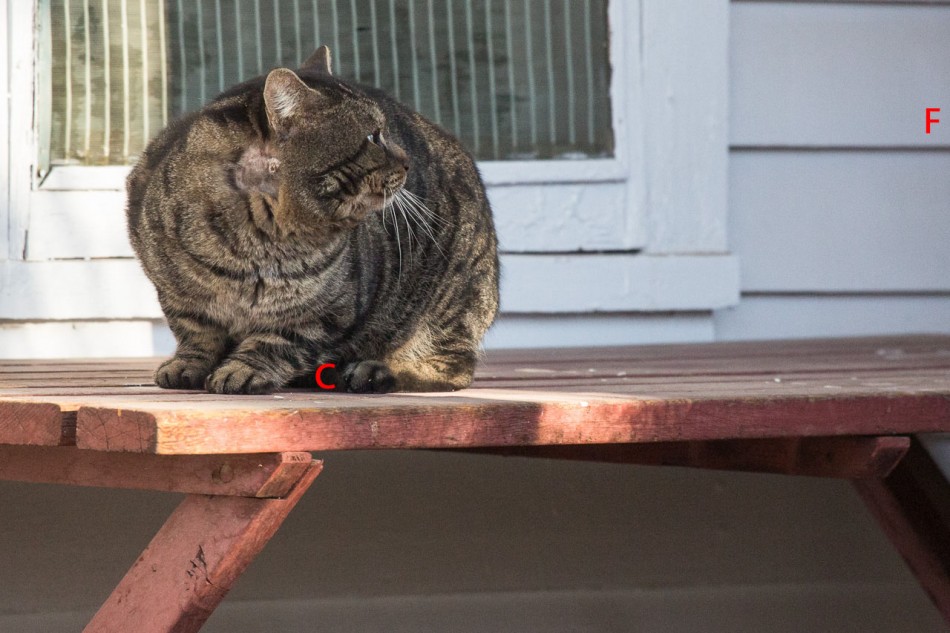
That indeed was the direction at least two of these cats darted, though again they seemed to mock me by looking back to see if I was still in hot pursuit.

Home repair photos by Kenneth Chan Photography

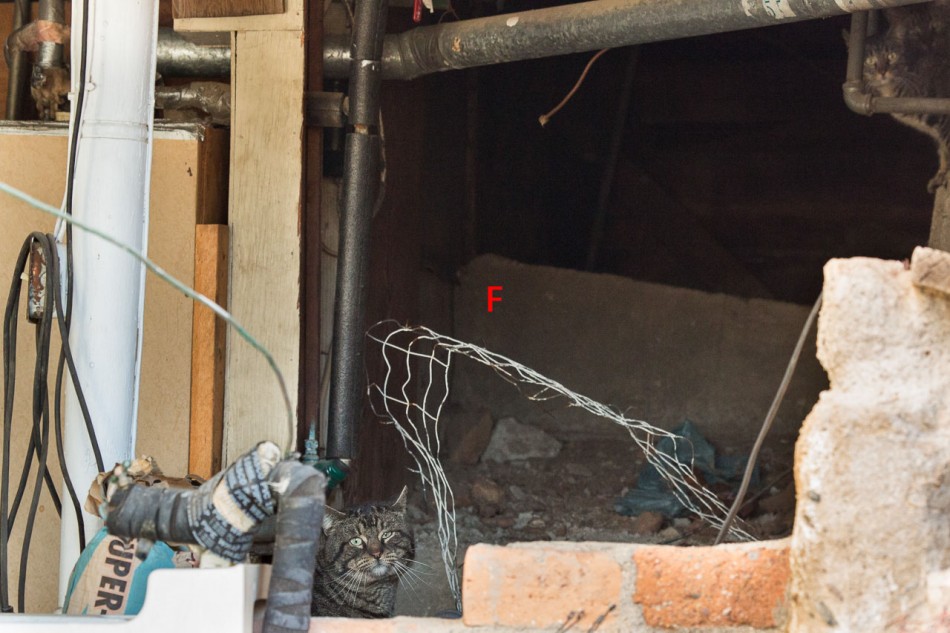
Undaunted, I decided that this time I would follow them into the dark, perhaps to their dismay.

Surveillance photos by Kenneth Chan Photography

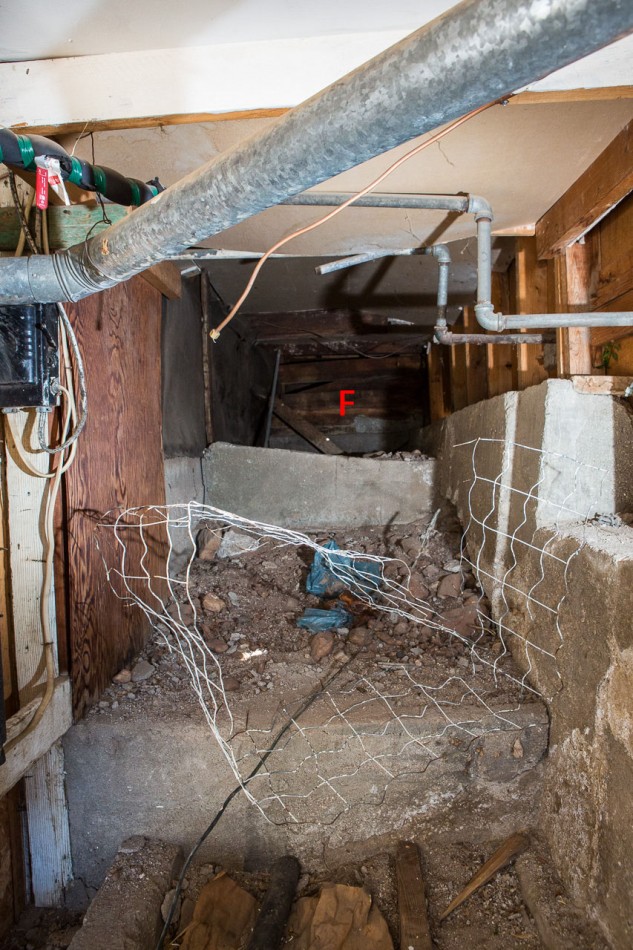
Here is a wider shot of this alcove, which contained dusty pipes, loose rocks and concrete, and the musky smell of cats that were not my own. I proceeded forward into this narrow space, hoping for an absence of scorpions and spiders.

Home repair photos by Kenneth Chan Photography 

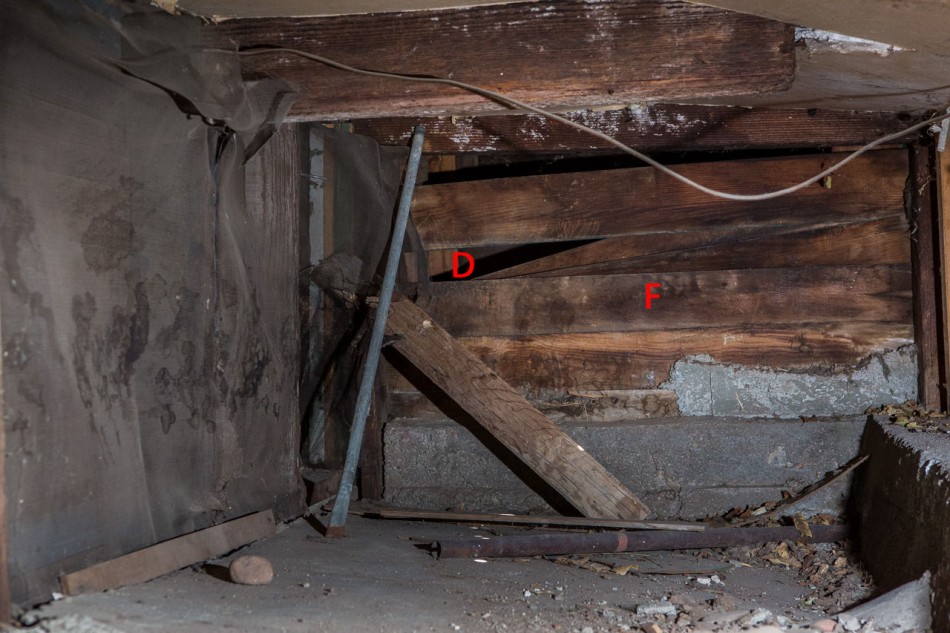
Here the nook reaches a dead end, save for some broken boards and pipes which clearly did nothing to stop the cats from slipping past. I, on the other hand, would have to find another way past this obstacle.

Home repair photos by Kenneth Chan Photography

I retraced my steps and exited the alcove, and decided to investigate the storage rooms next. Here is the area directly outside of the two storage room doors. Alcove F is located directly behind this way, and the cutaway panels created for these overhead pipes were one way the cats were gaining access into the storage areas. Workshop E is to my left and Storage Area D is behind me.

Interior photos by Kenneth Chan Photography

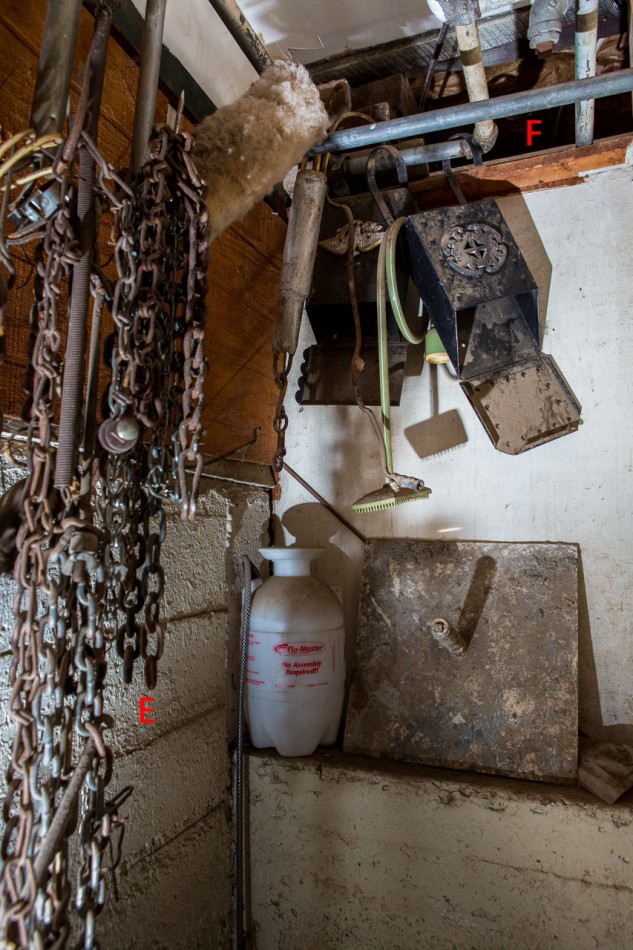
Here is the entryway to Storage Area D. The exit door is the one with the word “LIGHT” scrawled on it, and the heater is the metal object directly above the door.

Home repair photos by Kenneth Chan Photography

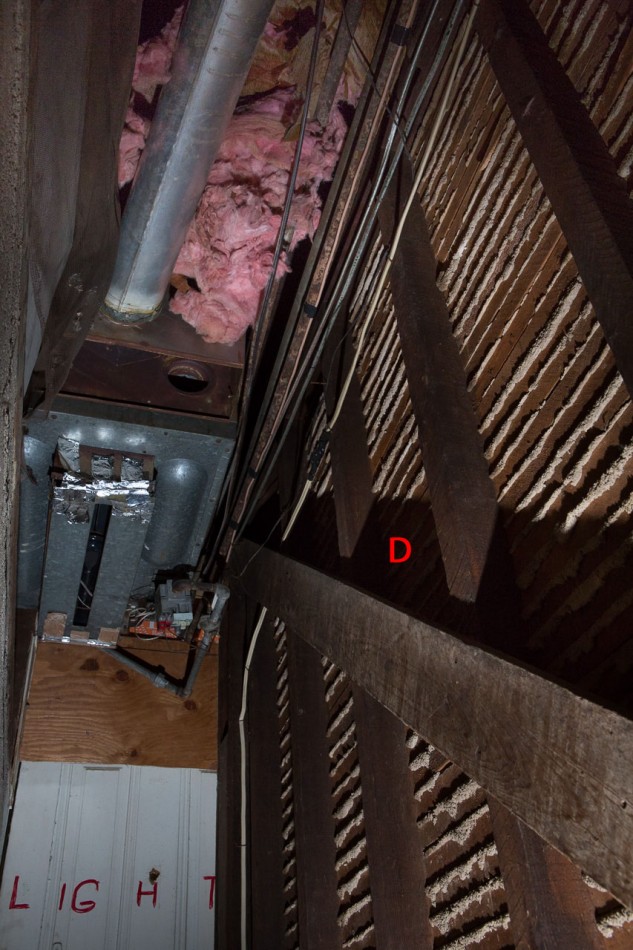
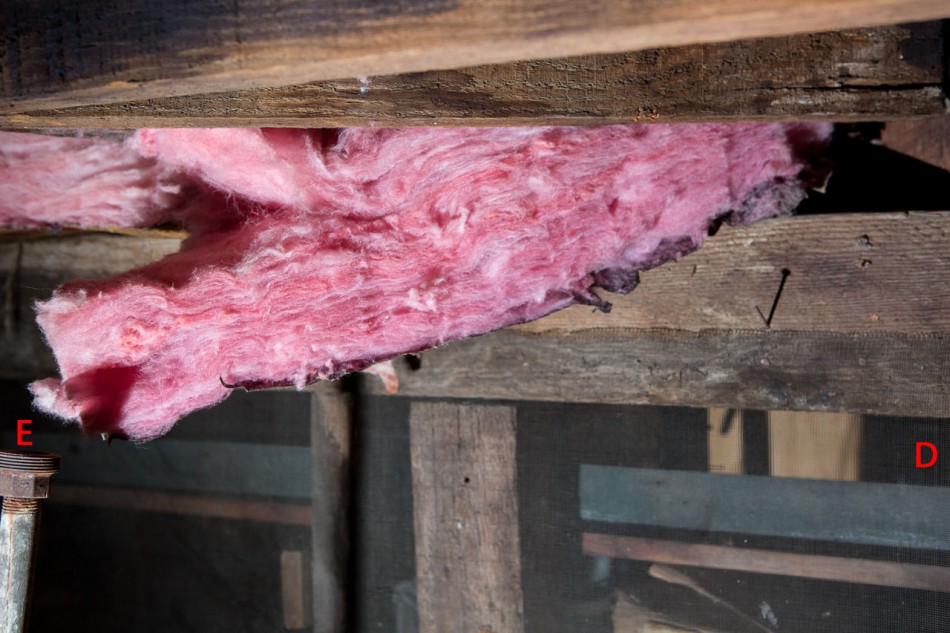
Here’s a closeup of the pink fiberglass insulation that I have tried to cram back into the crevices rather unsuccessfully due to the way they have been shredded up by the intruders.

Home repair photos by Kenneth Chan Photography

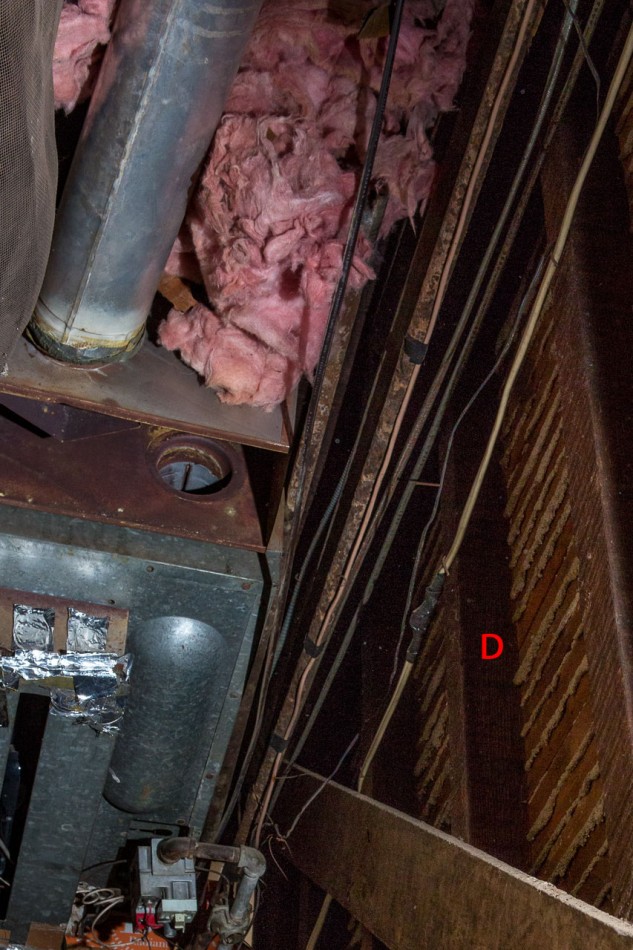
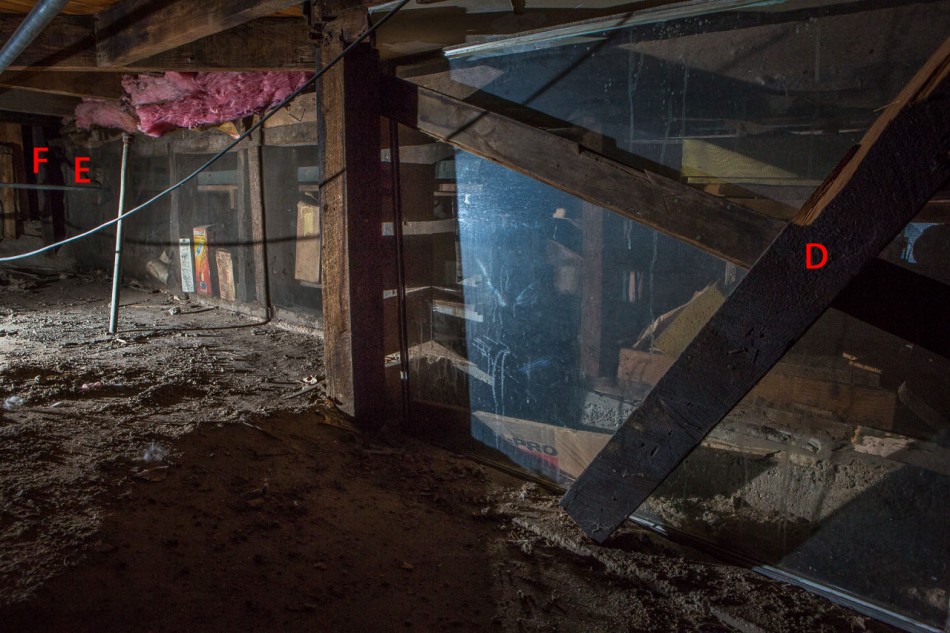
Here is the back section of Storage Area D. Through the mesh screen, you can see through to Workshop E and back to the Alcove F, as labeled below.

Home repair photos by Kenneth Chan Photography

Here you can also see that the pink fiberglass insulation has been disturbed.

Home repair photos by Kenneth Chan Photography

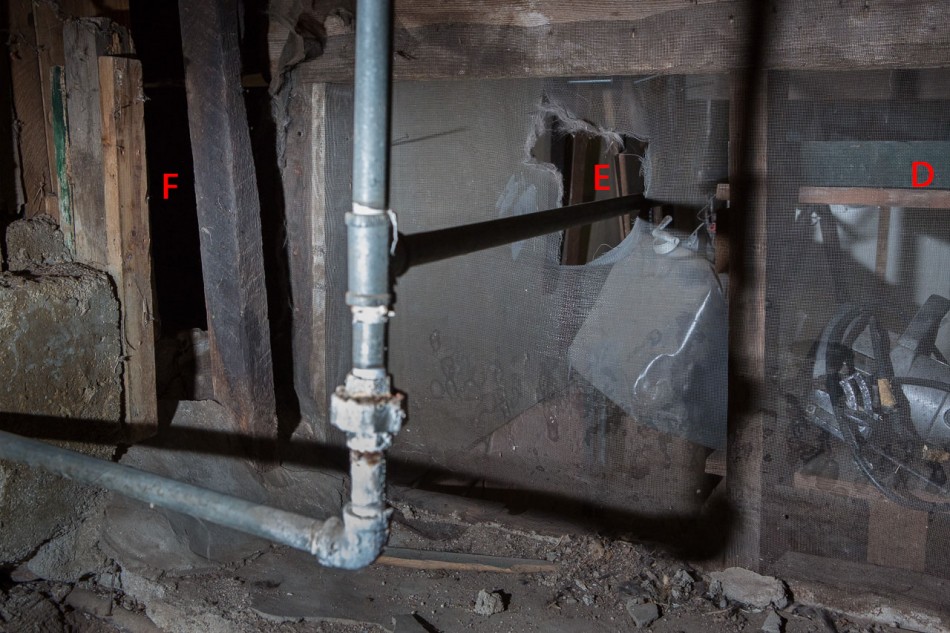
At the very end of Storage Area D, I discovered what appeared to be the connection between all three areas infiltrated by the strays. This hole in the mesh screen, designed to allow the pipe to pass through, has been enlarged to allow the cats to roam freely into Workshop E.

Home repair photos by Kenneth Chan Photography

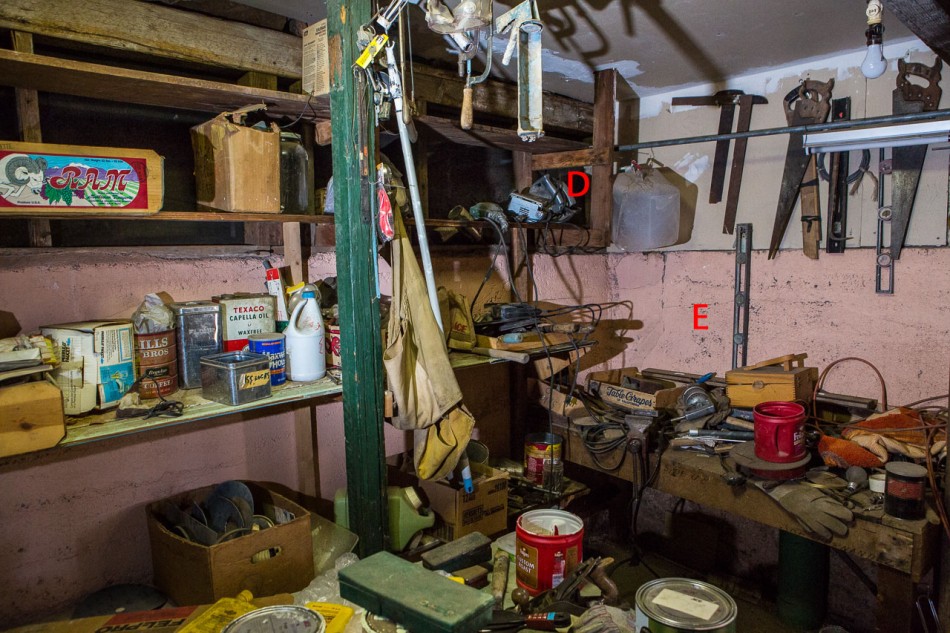
Here is Workshop E from the other side of the mesh screen. Label D indicates the hole that allowed the cats to traverse to and from this room via the shelves. All of the goodies in this workshop were left here by the previous resident.

Interior photos by Kenneth Chan Photography

With my newly-found discoveries, and with high confidence that I had temporarily scared off all of the intruding cats, I proceeded to block up the holes between areas D, E, and F with cardboard boxes and other junk that I found lying around. Will this be the end of our troubles, or have I underestimated the determination of these freeloading felines? Only time will tell.

How to Resize Photos and Images for the Web

Don’t you hate it when a webpage takes forever to load? I do too, so let’s look at one quick technique for reducing the load times for the webpages that you contribute to or manage so that your viewers will not suffer the same frustration. One of the reasons for slow-loading pages is that the images on them have not been optimized for online display. This common problem occurs when we post photos straight out of the digital camera onto the web without resizing them first, even if we will not need to view them at full-resolution online. Fortunately, many websites (e.g. Facebook, Flickr, WordPress) already make it a point to automatically resize and compress your images at the time of upload so that you don’t have to think about it. However, there remain many circumstances when having a basic knowledge of resizing will be useful, especially if you are working on your own website or want to control how large a version of a photo file you want to give to someone else (and to reduce the time it takes to email it to them). What follows is a brief tutorial on how to do this for free using any Windows or Mac computer with an Internet connection, using the free Photoshop Express Editor, which is part of the Photoshop Online Tools.

1. Launch a web browser and visit http://www.photoshop.com/tools to load the Photoshop Online Tools homepage. It should look like the screenshot below. From here, click the “Start the Editor” link, which is indicated in red. (If all you needed was a quick recommendation on which online tool to use for image resizing and you can take it from here, feel free to stop the tutorial and take it from here!)

01_photoshop_online_tools

2. You should be prompted to select a photo to edit. Click the Upload Photo button to proceed. (If you are prompted to install Adobe Air for your browser to enable this web-based photo editing application to run, visit https://get.adobe.com/air to download and install Adobe Air, and then return here to complete the rest of the tutorial!)

02_select_photo_to_edit

3. You may get a warning that, “the Photoshop Express Editor currently only supports JPEG files.” (So if your camera creates Raw image files, you will need to find a way to save those as JPG files first. We’ll leave that tutorial for another day!) Click the Upload button as shown below to open up the file browser. Select your photo file and then click OK.

03_jpg_only_warning

4. Your photo will load in the main editing window. As you can see on the left side of the interface, Photoshop Express Editor has many photo editing functions, and we will focus just on the Resize function in this tutorial. Click the Resize button to enter that module.

04_basic_interface

5. The box indicated in red is the Navigator window, which allows you to see a thumbnail of your entire image even if you are zoomed into the image. The smaller gray box in the Navigator window can be clicked and dragged to see the selected section in greater detail. Try out this optional step to get a feel for how this handy tool works. It will be particularly useful when you use the other editing functions available in Photoshop Express Editor.

05_resize

6. At the top of this same window, you will see some common resizing presets for Profile photos, Mobile devices, Email, and Website images. If you click on any of these, the maximum pixel dimensions will be set for your image. For example, the Website button will constrain the image to 800 pixels on the longest edge, which is generally as large an image as you would want for display on a website, since you need to account for users with browser windows of all sizes, including tablet users. Here is how each of the presets will constrain the longest edge of your image: Profile (150 pixels); Mobile (320 pixels); Email (640 pixels); Website (800 pixels). If none of the presets are appropriate for your needs, click the Custom button to set your own constraints for the pixel height or width. In this example, I clicked the Website button to constrain the image to 800 pixels.

06_resize_navigator

7. Once you define the pixel dimensions, you may notice the Navigator window update to show you a representation of the scale of your image. Click the Done button when you are ready to save a copy of your photo with the new edits.

07_resize_for_website

8. The application will ask you what you would like to do with your edited photo. Click the Save button to proceed.

08_click_to_save

9. You can now create a name for your new file. For photos that I am submitting to a publisher or someone else’s website, I prefer to list my name or initials, a short description of the image, and the longest edge of the image in pixels. In this example, the name of my new file is therefore kenneth_chan_venice_800px.jpg. Notice that the application will report how large the new file will be in kilobytes (KB) or megabytes (MB). The smaller, the better, so long as it serves your needs. Click the Save button to proceed.

09_rename

10. You will get a confirmation once the Save function is successful. Click the Done button to proceed.

10_confirmation

11. That’s it! Here’s my resulting photo, which has been constrained to 800 pixels so that it will display quickly for the web.

kenneth_chan_venice_800px

Ready to work on another photo? Visit http://www.photoshop.com/tools or click the Start the Editor link again!

Additional Considerations

Some of our readers may have some additional questions not covered in the basic tutorial above. They will be addressed below!

Q. What about dots-per-inch (dpi)? How come this resizing app doesn’t seem to address this parameter?
A. DPI is primarily relevant for printed materials. Whether you set your image to be, for example, 72 dpi or 300 dpi, it would still display the same nearly every display device (unless you’ve gone out of your way to configure your display device already, in which case you probably don’t need any help from me!). Most apps designed to help you create web graphics will automatically set images to be 72 dpi.

Q. Okay, so DPI doesn’t affect the image size on an electronic display, but my publisher still wants the file “at 300 dpi” for printing, so what do I do?
A. This is actually not too tricky, but does involve just a little bit of math. The main question you must first ask is, “What is that largest size that the final image will be printed?” Then you just multiply the target print dimensions by the dpi requirements. So if you need to print an image at 4″x6″ at 300 dots-per-inch (dpi), then your pixel dimensions need to be 1200 x 1600 pixels. If you need an 8″x10″ as your final product at 300 dpi, you would need to submit a 2400 x 3000 pixel image. Typical dpi requirements are 72 dpi for screen display only, 180 dpi for basic-quality prints, and 300 dpi for high-quality prints. (Incidentally, this accounts for why a lot of images look great on the web, but look blocky and pixelated when printed — they probably didn’t contain enough pixels to be printed well.)

Q. What if I’m required to submit an image that’s a maximum of 800 pixels on the longest edge, but I’m also told that it will need to be printable at 300 dpi? Can I do that in the same file?
A. It’s rare for a publisher to require both constraints so rigidly defined for a given image file, and here’s why: Let’s say the image was a total of 800 x 600 pixels in order to meet the pixel requirement. At 300 dpi, that image would print at 2.7 x 2 inches — barely bigger than a postage stamp! That’s probably not what the publisher really wants, and the awkward wording of the requirements likely stems from a misunderstanding about the relationship between pixel dimensions and print resolution in dpi. If you were preparing an image for both web and print media, it would be ideal to submit two versions of the image — one smaller version for the web, and one that is much larger for printing.

[sc:ask]

Basic TTL Flash Strobes: Super Quick Review

Should I buy an external flash? What’s a flash with good features and price?

If you’re in a big hurry to get an external flash, go ahead and just get the YongNuo YN-468 II for Canon or the YongNuo YN-468 II for Nikon cameras. Otherwise, keep reading to better understand why you should even care about getting this accessory.

There are lots of reasons to have at least one external flash in your camera bag. The primary reason to get something better than the built-in flash on most cameras is that built-in flashes produce in-your-face lighting that is considered unflattering, uncreative, and sometimes downright ugly. Direct flash is responsible for most cases of red eye, hard shadows on the wall behind your subject, and distracting reflections from shiny surfaces in your scene, among other problems that diminish the quality of a photo. Using an external flash gives the photographer added versatility by allowing the light to be “bounce” into the scene from a nearby wall or ceiling instead of directly from the camera’s point of view. This can result in more pleasant, softer lighting and natural-looking portraits.

With that in mind, most budding photographers probably should get an external flash that supports TTL metering, which is a kind of “auto” mode for flashes. When the external flash with TTL is mounted on the camera’s hotshoe, the camera’s computer helps calculate how much light to output through the flash at the moment that you take the photo. In TTL mode, the main control a photographer has over the flash power is to increase or decrease the flash compensation level, usually with the + or – buttons on the flash unit. For example, if you took a photo of a kid at a birthday party and the background of your photo looks good but your subject in the front is lit too brightly by the flash, you can press the – button to decrease the flash power for the scene before shooting again.

The external flash I have tried that has the best price-to-features ratio is the YongNuo YN-468 II TTL Speedlite. There is a YongNuo YN-468 II for Canon as well as a YongNuo YN-468 II for Nikon cameras. It sports a basic TTL mode as well as a Manual mode for when you want exacting control over the flash power. If I knew nothing else except that you wanted to try an external flash for your Canon or Nikon DSLR, this would be my recommendation.

If you want to save some money and you are comfortable using the Manual mode of your camera, then you may also want to investigate the YongNuo YN-468 II, which works for both Canon and Nikon. Keep in mind that it truly does not offer any “auto” mode, so you must dial in the exact flash power that you want. That’s the level of control that I want, so I appreciate the simplicity and price of this unit. I often use up to four YongNuo YN-468 II units in my professional work, but it took years of training, experimentation, and practice to consistently achieve the results that I want in my flash photography.

For a further discussion about flash photography gear, please see the “Gear for a New Strobist” article.

[sc:ask]