Apply Metadata Presets During Import in Lightroom

One of Lightroom’s main strengths is helping photographers apply the same settings across a batch of photos. One of the things I like to do in my workflow is rate everything as 3 Stars from the beginning, and then during my editing process I move them away from this “neutral” rating (with 1-Star indicating it’s not worth keeping, and 5-Stars meaning it’s a winner). I was never quite comfortable with leaving photos at Zero Stars because then they get left out when I am filtering by Rating. While I’m at it, another setting that would be useful to apply to all photos right from the start is my copyright metadata. So rather than performing this operation for each photo, let’s set it up in Lightroom to do the heavy lifting for us.

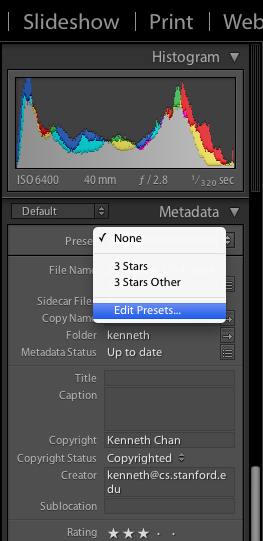
First, you need to create the Metadata Preset which defines what settings you want to apply. For example, I need a preset that will always set the Rating to 3 and also add my copyright info. You can edit or create a new Preset in the Library mode under the Metadata section on the right side and selecting Edit Presets.

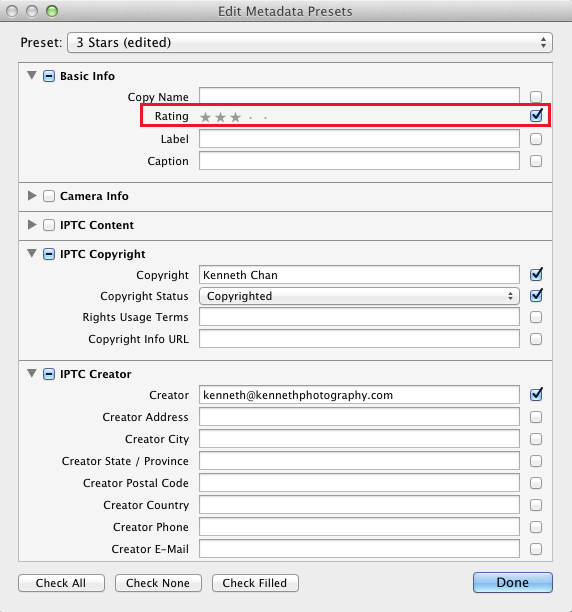
A dialog box pops up and now you need to define and save your preset. For example, I added my default Rating and Copyright info. When you’re ready, click Done and you’ll be asked whether you want to save this new preset. Give it a descriptive name.

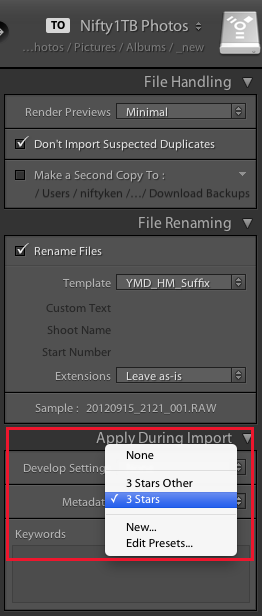
Now you can select this Preset to easily add the setting you need a large batches of photos at once in the Library mode. You can also add this preset during File > Import Photos and Video. Just select the preset under the Apply During Import section of the Import dialog box. In fact, the next time you come back to Import, that Preset will probably be preloaded for you, saving yet another step (but be careful if that’s not what you want)!

That’s all there is to it! If your preset is not quite the way you want it, remember that you can always go back to edit the preset. But if you need the updates on your older photos, you’ll have to reapply the modified preset to them again for it to have an effect.

Hope that helps speed up your Lightroom workflow as it has for me. Happy editing!

[sc:ask]
Intro to Storyboards

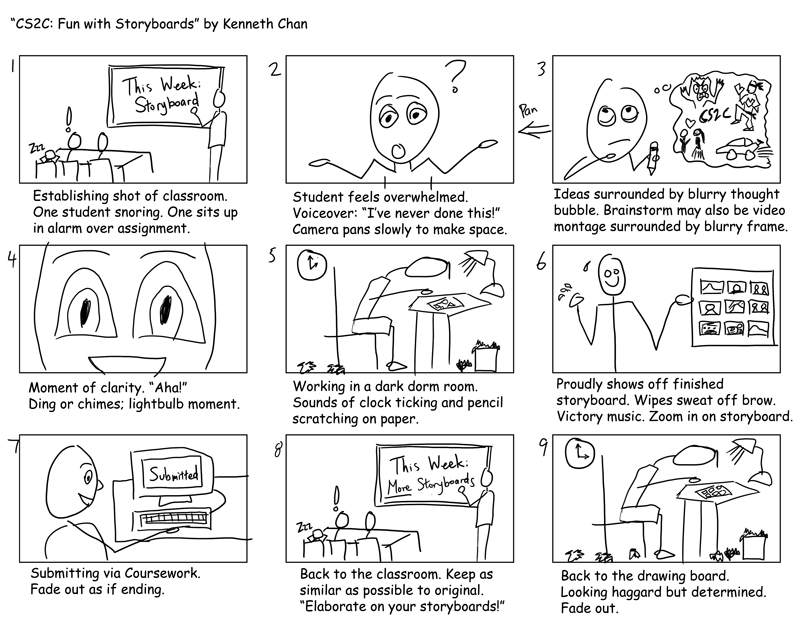
Planning is key to a smooth and high-quality production, whether it’s a feature film or a PowerPoint presentation. Many people are accustomed to the idea of generating a script during the planning phase, but a script is often not enough. For a video project, storyboards are used to sell your idea, discover problems with the story before you start filming, and make sure everyone from the actors to the camera operator is on the same page about what needs to be done to complete the project. Before you pick up a camera, spend the time to think about what shots and angles you want (wide establishing shot, close-up details shots, b-roll/cutaways, etc), the purpose behind each shot, the props you’ll need, and the story you’ll tell with action on screen. Click to view a compilation of ideas and techniques for Cinematic Storytelling. Think about your locations and lighting, your crew and cast, and how you’re going to get from beginning to middle to end within your time and other budget constraints. A storyboard helps keep the project on track.

You can create a storyboard in whatever format makes most sense to you. Many people like to sketch out each shot on paper and then scan it. Here are two templates for you to consider using: a 16×9, 3-Up template and a 16×9, 9-Up template. Other people like to take mockup photos with their digital camera, and then use PowerPoint to arrange them. It’s up to you to choose the method; what’s ultimately important is that you do this planning before you pick up a camcorder to start shooting. Your storyboard doesn’t have to be really complicated nor artistic (stick figures are fine), but it needs to have a clear beginning, middle, and end.

In early drafts of a storyboard, there are often gaps in the story that can be further expanded. For example, there’s a whole story to be told between frames 8 & 9 in the storyboard above. How does the main character react to the news from the instructor in frame 8? What does he do about it? How does he eventually end up at frame 9? Check out one possible storyboard expansion that is meant to be give more thought and detail into what’s happening between Frames 8 & 9 of the original.

That’s the basic introduction to the process. If you’re feeling stuck, here are some additional resources detailing how to think about storyboards:

[sc:ask]

Video Interview Tips

I had a recent email conversation with someone looking to do a basic video interview, but hoping to avoid typical mistakes that make the video boring or hard to watch. I wanted to share the thread for others who may be similarly interested!
 

Would like some advise from you. Our parenting ministry is doing a project interviewing couples and taping the interviews. About 30 minutes for each couple.

Any suggestion on background, and how to tape to make it less boring than just setting the camera on the tripod? We’ll be doing it at church.

 I used to teach how to do better video interviews at Stanford, so hopefully I can share some good tips. =]
 
  • You absolutely want to use a tripod for interviews. “Boring” is better than something that makes people seasick. =] 
  • In terms of background, probably the plainer the better. Try to avoid distracting background elements that appear to grow out of people’s heads, like plants, poles, etc. 
  • I would advise not having people look directly at the camera. Have them talk to the interviewer, not the camera. They will feel more comfortable and it will look more natural in the video.
  • The essence of good interviews is good audio. If it doesn’t sound good (e.g. one person’s voice is loud and the other is too soft, or there’s background noise or buzzing/hissing), the audience gets distracted and won’t have much patience for the video. If you have lavaliere/lapel mics or shotgun mics, use them!
  • Ruthlessly edit and remove unnecessary video segments so that the final product is to the point (if it is meant to be watched by an audience). If certain things the interviewees say don’t actually contribute to answering the question, etc, it should be cut out.
My favorite tutorial on producing awesome high-quality video interviews is here, but be warned — there’s a lot more work involved to “do it right!”: 
 
[sc:ask]

Gear for a New Strobist

One student recently asked me about what gear to get if he’s just getting into flash photography after watching me work on-location. I wanted to share the thread for others who may be similarly interested.

What do I need to get started in flash photography? I want adequate gear at a student photographer price.

Though flash photography is a challenging field, you don’t need a lot of fancy gear to start! The combination of gear I recommend provides excellent performance at a very reasonable price that should fit any budget:

External Flash: I own six YongNuo YN-460ii external flash units because they are just that good. They have the same power output as the much more expensive Canon 560EXii. However, they are fully manually operated, so there won’t be fancy features like ETTL (Auto) flash modes or a battery power indicator. But the power levels are super easy to adjust, unlike the more complicated flashes. And if I break them at a shoot, I don’t have to cry.

Wireless Transmitter: The CowboyStudio NPT-04 Wireless Flash Trigger work well for me — I’ve never bothered trying Pocket Wizards, which don’t have much benefits if you’re using cheap manual flashes anyway. If you are using multiple manual flashes and want to save some money, considering getting the 2-Pack Flash Triggers.

Flash Stand Bracket / Umbrella Holder: Manfrotto 026 Swivel Umbrella Adapter: It’s super solid.

Umbrella: You really don’t need anything fancy. Get cheap ones like the CowboyStudio 43-inch Umbrella and replace them if they break. =]

Light Stands: CheetahStand C8 light stands are AWESOME. Super useful for when you need to move your light around a lot, like on-location portraits. Slightly less important if they’re going to stay put for a while. One annoying thing is that due to the very design of the mechanism, the CheetahStand hates being on uneven ground and the legs have a hard time deploying in grassy areas. So I’ve had to figure out ways to use my foot to engage the mechanism in grass, and sometimes I have to get creative with securing the stand if the ground is not even. But if you have an assistant, then none of these issues are a big deal. =]

Gels: Rosco Strobist Collection gels give you probably all the colors you’ll ever need for color correction / matching, and creating different moods. Use CTO / orange gels to simulate sunset, or purple & yellow on two different strobes to create a dance club look. If you don’t want to get a fancy gel holder, you can easily attach them to the flash using gaffer’s tape.

Okay, that’s all I can think of to get you on your way!

[sc:ask]

Lightroom 4 “Files Could Not Be Read”

Last night, I was working in Lightroom 4.1, trying to import a number of video and photo files from a SanDisk Extreme IV 16GB compact flash (CF) card used early that night with a Canon 5D Mark III, but kept getting this message on two of the HD MOV files: “The following files were not imported because they could not be read.” I tried several times, and kept getting the same error. Trying not to freak out, I tried to figure out what could be wrong. I came up with several theories: 

  • The files got corrupted and could not be read because they did not finish recording properly. I was having some problems with third-party LP-E6 batteries that would just turn off my camera without any warning. Three bars, two bars, and then boom! The camera turns off. I though I would save a few dollars by getting non-OEM LP-E6 batteries, but this turned out to be a crummy idea. It also doesn’t charge properly, causing my Canon battery charger to go from 1 flash (very empty) to 2 flashes (half full) to 3 flashes (nearly full) to blinking nonstop (error) instead of lit up green and not flashing (full). Anyway, could it be that a faulty battery prevented the file header from being completed properly? The problem with this theory is that I would have thought the header would have been written at the beginning of the recording process. What kind of data is written to the buffer? What process occurs at the end of the recording to wrap it up?
  • I didn’t properly format the CF card before recording new content on it. This seemed somewhat unlikely to be the source of the problem, as I exclusively use these CF cards only on my Canon 7D and 5D Mark III, so I expected that the file system is compatible even if I forgot to format it. Also, this seemed strange because most of the videos came off the card just fine, but I just had these two files that seemed “corrupted.”

What else could have gone wrong? Please leave a comment if you’ve had a similar experience or theories. Or even better, if you have a solution!

Update: Just found out the real reason for my problems. The external hard drive I was trying to write to didn’t have enough space! I was trying to copy MOV files (each 4GB+) to a drive with 3GB left. I deleted some unneeded files, and tried again. Lightroom had no problems ingesting the files this time. Oops! Of course, it would have been much better had the error message been, “The volume is full. Cannot copy these files to volume.” In any case, I’ll leave this post up in case it helps anyone out!