Camera Lenses for your Smartphone or Tablet

Thanks for letting me try those little lenses that attached to my iPad the other day. How do I get them myself?

This question came from one of the students in my photography class. I had brought in a variety of lenses for them to try with their smartphone and tablet cameras. This is a fun and inexpensive way to add some new capabilities to “the camera that you always have with you.”

One lens kit that I tried out was the Universal 3-in-1 Camera Lens Kit with Clip. The kit came with three lenses: a wide-angle lens, a macro lens, and a fisheye lens. The wide-angle lens allows you to “fit more” of the scene in your frame, while the fisheye lens does that to an even greater extent, but it also introduces some serious perspective distortion. With a fisheye lens, straight lines become curved, which you may like for dramatic or creative effect. The macro lens allows your camera to get a lot closer to the subject while still being able to focus, therefore allowing you to take exciting closeup photos of your subject. One interesting characteristic of this kit is that the wide-angle lens and the macro lens come screwed together. You keep it in this configuration when using it as a wide-angle lens, and unscrew the “outer” lens when you want to operate it as a macro lens. I liked the spring-loaded clip that allows you to attach the lenses to nearly any smartphone or tablet on the market. The clip is easy to take off, making it an easy system that you can share with friends.

The other kit I tried out was the Magnetic Lens Kit. This kit worked nearly the same way as the clip-on kit, except that the back of the lenses are held magnetically onto your smartphone or tablet. If the back of your device is not naturally attracted to magnets, the kit comes with a few self-adhesive metallic stickers that you can stick around the perimeter of the camera lens so that the kit lenses will “stick” to the device in the right place. Both the magnetic lenses and the metallic ring are easy to remove, but my concerns regarding this kit are that it’s hard to share around the adhesive metal ring with your friends, so it wasn’t as useful in a classroom environment. But if you’re just getting these lenses for yourself, it may not pose a problem.

Overall, the kits reviewed here were each less than $20, which is a small price to pay for some new fun and functionality for your camera. Out of the three lenses, it seems that the macro lens was the biggest hit, delivering the most bang for the buck with regard to fun factor and image quality. Have you used any other types of lenses for your smartphone or tablet? Please leave your thoughts in the Comments!

[sc:ask]
Gear for an Event Photographer

A reader recently asked me about what gear I use for event photography, since that is a large part of what I do. I wanted to share the thread for others who may be similarly interested.

What camera gear do you use and recommend for event photography in general?

I think the key here is recognizing that every event is different in terms of the lighting conditions, the house rules of the venue, and the specific needs of your client, which may dictate factors such as how much you are allowed to move around and how close you can get to the action without being in the way, as well as how much you can alter or add to the lighting without being a distraction. The combination of gear I use and recommend provides excellent performance for capturing any scene:

In terms of event photography, whether it’s a wedding or a birthday party or a conference, my most common two-camera setup is a Canon 5D Mark III with 24-70mm f/2.8 lens and a Canon 7D with Canon 70-200mm f/2.8 IS lens for optimal coverage. This is my combo for 90% of event shoots. The reason I want to have two cameras with me the whole time is so that I can cover a full range of the action. When I need a wider shot, I pick up the Canon 5D with the wide-angle lens. When I need to get in close, I use my Canon 7D with the telephoto lens. Yes, you can of course use “sneaker zoom” by walking closer to or farther from your subjects, but you don’t always have the luxury to do so, due to the speed at which events are unfolding or due to the house rules of the venue. For example, I’ve now been to several weddings where the church coordinator’s rule was, “Pick a spot, any spot, but you’re not allowed to move around during the ceremony.” So my gear has to be able to cover a full range. The reason I’ve invested in two camera bodies is for speed — I can immediately change ranges without fumbling with lens changes. There are many events I cover where this optimal combination allows me to not have to change lenses at all during the entire event. That is a huge plus to me.

There are of course times when it makes sense to change lenses, so in my gear bag I also have a Canon 16-35mm f/2.8 lens for extra wide shots, and Canon 100mm f/2.8 L IS Macro lens for the serious detail shots (like rings, etc). I used to shoot with more primes like the 50mm f/1.4 and 85mm f/1.8 when the venue was very dark, but I hardly bother anymore because I can pump up the ISO to 3200 and 6400 and still get great image quality on these camera bodies (particularly the Canon 5D Mark III). I like the versatility of zoom lenses when the scene is unpredictable and I want to be ready for anything.

In order to carry both cameras on me during the event, I use the BlackRapid DR-2 double strap, which has been way better than getting tangled up with two standard camera straps. The DR-2 can also be separated into two separate shoulder straps so you can keep your cameras mounted on them even when you only need one camera. The only thing that is annoying about the BlackRapid design is that it requires use of the tripod mount, which effectively means I have to take off the BlackRapid fastener before using the camera on a tripod or monopod. Those are not part of my standard arsenal for event photography anyway, so it has not been a major issue for me.

I do also set up portable lighting for some events, such as wedding receptions, and that is covered in the Gear for a New Strobist article. You can also check out the rest of the gear I use on the Gear I Love Using page of my photography blog.

Finally, to carry all of this gear with me everywhere I go, I use the Lowepro Pro Roller x200, which is a serious roller bag that is also carry-on compliant for flying. The pop-up pull handle can be very easily deployed with one hand, and you can even mount a camera or an external flash on the handle if you’re in a pinch for a tripod or light stand. I like that it comes with a security cable mechanism so that you can lock it down to an immovable object, and I’ve used it a few times at events so that a thief can’t just easily walk away with my whole bag while I’m distracted. It has lots of configurable compartments and heavy padding to protect my stuff while providing quick access when the bag cover is unzipped. I usually have the following loaded up in there: Canon 5D with 24-70mm lens mounted, Canon 7D with 70-200mm lens mounted, Canon 16-35mm lens, Canon 100mm Macro lens, four YongNuo 460ii strobes with wireless transmitters, Canon 580EX II flash, and a bunch of smaller accessories, batteries, etc. No doubt, this thing gets VERY heavy when fully-loaded, but having this bag has certainly saved my back! I can’t believe I used to try to carry most of this stuff in two overloaded backpacks!

Anyway, here was a long answer to your question. This is how I find myself best prepared for whatever happens at an event. Hope that helps!

[sc:ask]

Hilarious Reviews: Sigma 200-500mm f/2.8 lens

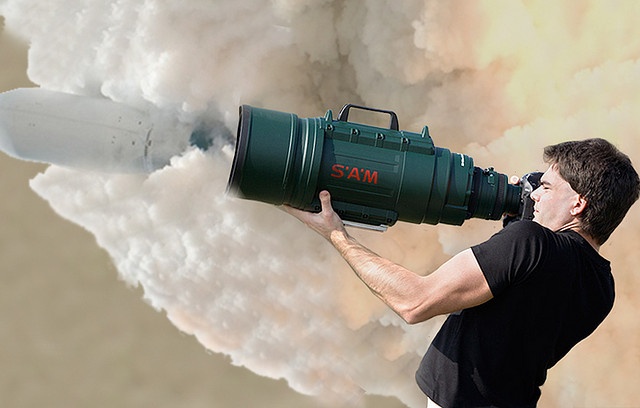
The Sigma 200-500mm f/2.8 lens is a 35 lbs. telephoto zoom lens that is repeatedly mis-reviewed as a rocket launcher, portal gun, space telescope, doomsday device, etc. Last I checked, there were no more than 3 serious reviews in the whole batch. The $26,000 price tag probably prevents it from getting into too many people’s hands. Sadly, most of the hilarious customer-submitted photos (with a heavy dose of Photoshop) have been removed already. Click the link or photo to check out the Amazon reviews yourself!

Sigma 200-500mm f/2.8 lens rocket

Portable Inkjet vs. Dye-Sublimation Printers

I photograph a lot of party events and dances, and wanted something specifically for the purpose of printing out 4″x6″ prints on-location, so it had to be as small as possible while producing images of acceptable quality for sale to party guests.

The two models I tried out for this purpose were the Epson PictureMate Charm (PM225) inkjet printer and the Canon Selphy CP900 dye-sublimation printer. I wanted to see what significant real-world differences I could find between the two models, which both specialize in printing 4″x6″ prints. I brought them to actual dance events and printed guest photos on them throughout the evening using Adobe Lightroom 4 (which was also tethered to my camera).

The Epson PictureMate Charm inkjet printer immediately impressed me with its sharp contrast and colors using images straight out of camera. I have generally been very pleased with the quality of Epson photo printers, and this was no exception. The availability of a matte / lustre paper option was very appealing, as it has a very professional quality to it, and also reduces fingerprints from marring the photo surface. The print drivers also easily supported borderless and white-bordered options without any difficulty. All in all, I found the Epson PictureMate Charm to be a pleasure to use. However, my concerns with it revolve around the cost per print, and long term usability of the unit. As an initial cost, the printer itself is at least $50 more than the Canon Selphy CP900. The ink and paper are generally purchased together as a package, but a basic search for reviews online show that many people seem to run out of ink in the cartridge long before the paper is used up. It seems to me Epson should’ve erred on the side of the paper running out before the ink to avoid customer complaints. Long-term, there are also the typical reports that the ink cartridge and print head can dry up if you go too long without using it, which is a problem if I want to store the printer in between party events. It would be a nightmare if the photos started coming out streaky or missing bands of color due to clogged print heads. One final concern is that Epson appears to have discontinued this printer (and possibly the PictureMate series), so you may be stuck if you grow to rely on this printer and then can’t get replacement units or parts.

The Canon Selphy CP900 dye-sub printer had its own share of strengths and weaknesses revealed during my testing. Right out the door, the printer itself cost $50 less than the Epson PictureMate Charm and was even more portable. The paper and ink cartridge packages were also quite a bit less expensive per print. One interesting property of dye-sub cartridges to note it that it will print exactly as many prints as it is rated for. A 50-print cartridge will generate exactly that many prints, no more and no less, regardless of the image content. I actually found myself appreciating this trait; even though it means you won’t be able to squeeze out a few more prints from a cartridge, it also allows you to very accurately predict how many more prints you have, which cannot be said for the inkjet printers. So what about the print quality? I’d have to say that even though the dye-sub printing process is known to produce continuous tones like that of film prints, I found the overall image quality to be a bit softer than I preferred, especially when held side-by-side against a high-quality inkjet print. Further, the dye-sub printing process is extremely sensitive to dust particles, which can easily get into the paper path and get baked into the photo, resulting in colored blobs in the final product. Dye-sub printing is a 4-color process, and the way the Canon Selphy CP900 works requires it to allow the paper to exit the printer 4 times to allow each plate of ink and glossy coating to be applied. Not only does this design allow for dust to slip into the print, but it is possible for over-enthusiastic guests to accidentally disturb the printing by pulling out the print prematurely during one of the passes. The Selphy series does not appear to offer a matte option, and the paper itself bears slightly unattractive tear-off edges that need to be manually removed after printing. Also note that the resulting sheets are every so slightly smaller than an actual 4″x6″ print. Finally, the Canon print drivers don’t seem to make it easy to print perfectly borderless nor bordered prints. I found the printing offsets to be a bit unpredictable, requiring some tweaking to actually get the images to be perfectly centered on the sheet. I suspect that most people would have been willing to guess and check with test sheets until they got the measurements just right. Being a dedicated 4×6 printer, I feel that this should have been built-in functionality in the print drivers.

All in all, here are my recommendations. If you want the best quality 4×6″ prints that exceed what I’d expect from your typical drugstore prints, and you don’t mind the added cost and possibility that you won’t be able to get replacement units/parts/media, go for the Epson PictureMate Charm. If you want an economical choice that makes some compromises on quality (that most people honestly might not even notice, except for those pesky dust blobs), and you like the idea that the ink will basically never go dry, then go with the Canon Selphy CP900. Either way, both printers make an impressive showing and highlight the promising options for portable photo printers.

[sc:ask]

Recommended Export Settings for Lightroom

One of the things that Lightroom is great at is saving you steps in your workflow. This is true in the export process as well, where you can define some basic presets to serve as a starting point for your export needs. Let’s look at three common scenarios:

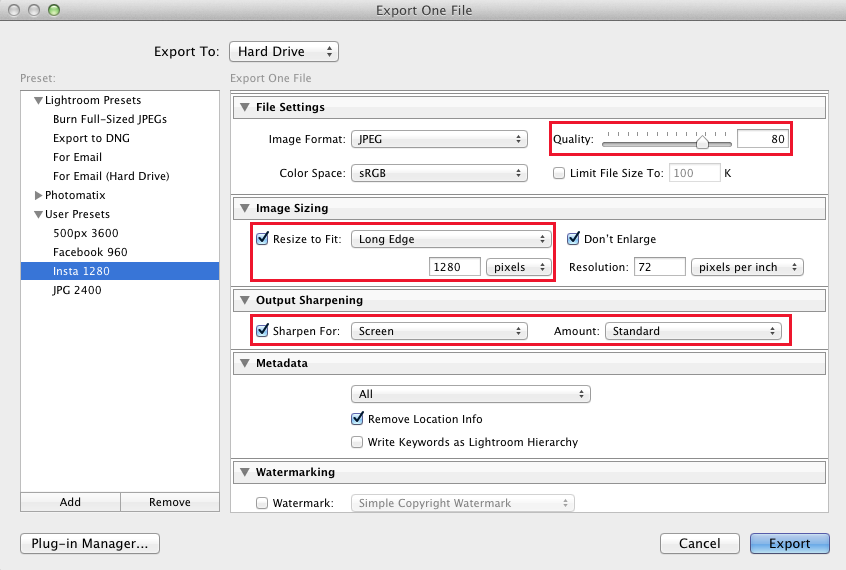
Export for Emailing: Let’s say you have a batch of photos you want to send to your friends to enjoy on their computers, and you want to email them after exporting. You don’t want to export full-resolution versions of the files, because it will take forever to send, but you do want them to be large enough to be enjoyed full screen on at least a laptop screen. I recommend exporting the files with a 1280-pixel constraint on the Long Edge of the photo. That means the exported photos in this batch will never exceed 1280 pixels on any edge. I’ve also set the Quality to 80, though you might be able to get away with even less, like 60, for casual viewing. Finally, I set the Sharpening mode to Screen since that’s how it will be viewed. If you are happy with these settings and want to use them again, remember to click the Add button at the bottom of the Presets list before clicking Export and leaving this dialog box. (Note: In this scenario, I’m not talking about inserting photos into your email message — for that function, you’ll probably want to have photos that are much shorter than 1280 pixels on the Long Edge. Probably 400 to 640 pixels is enough.)

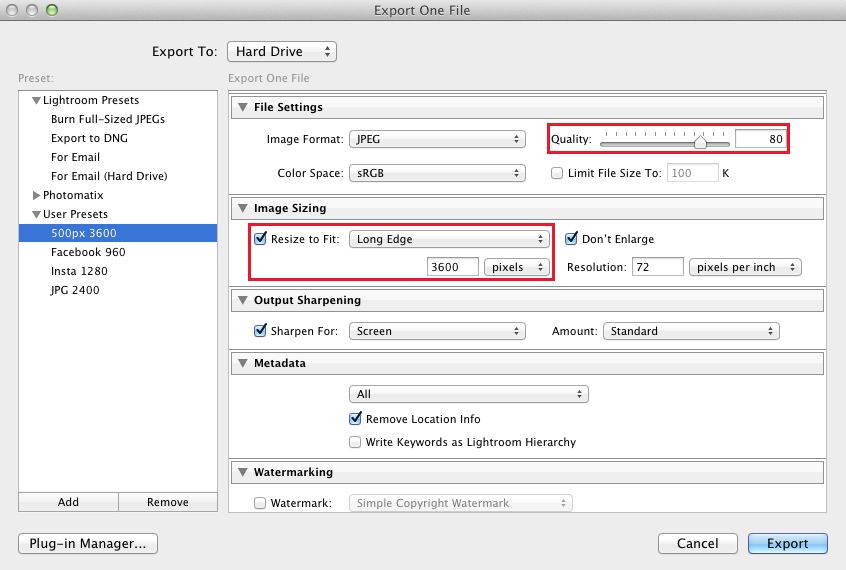
Export for Casual Printing: If you want to create photos that will be ready to print at a decent quality, you’ll want to export higher resolution images. Set the Long Edge to be no more than 3600 pixels. This should easily allow prints up to 8″x10″ or even more. You can also set the Resolution here to be 150 or 300 pixels per inch, though many printing programs will handle this conversion on their own.

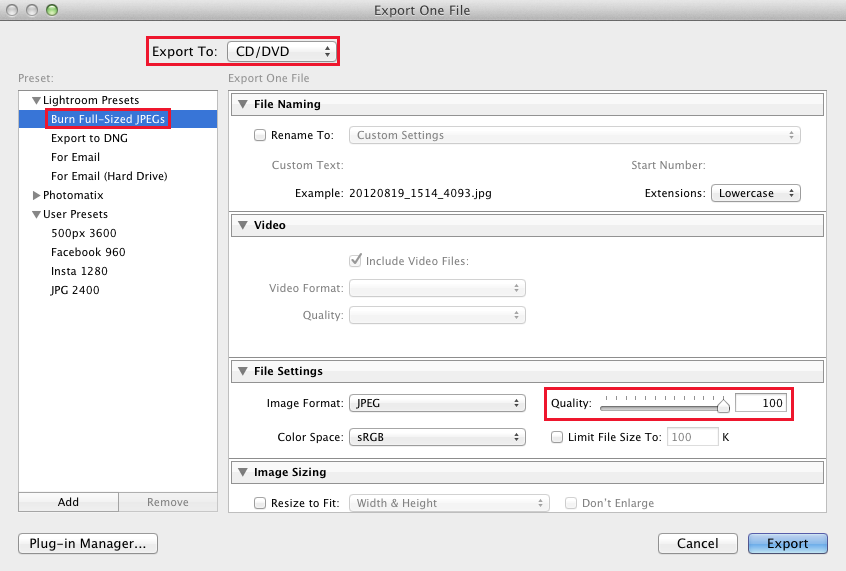
Export Full Resolution: Finally, let’s say you want to create an archive version of the images at the best quality possible. There’s actually already a Lightroom export preset for this called “Burn Full-Sized JPEGs.” As you might expect, the Quality setting is 100 and the Resize to Fit option has been turned off. One final thing to note is that this preset defaults to Export To CD/DVD. So as soon as you click Export, Lightroom will ask you for a blank disc. If that’s not what you meant, change the Export To setting back to Hard Drive.

That’s it for now. There are of course many other export configurations that might benefit you. These were just a few samples to help you understand the process for defining your own presets!

[sc:ask]