Learn the basic tools for recording and editing your own audio program or podcast using GarageBand 4, which is part of the Apple iLife ’09 package.

A super-quick-start video tutorial for Creating a Podcast is provided by Apple.
Getting Started
Click and download the file called meyer_minute_podcast.zip to a temporary storage space on your computer. From your computer, double-click meyer_minute_podcast.zip to unpack a folder containing the tutorial files. The following is a listing of the package contents:
- meyer_minute_narration.mp3 is the “uncut” version of audio recording, which you will be editing.
- meyer_minute_narration.txt is the original script of the podcast so you can follow along.
- meyer_announcement.mp3 is the recording of the Meyer closing announcement which will be used in the podcast.
- meyer_minute_done.mp3 is a sample of a finished podcast for your reference.
Create a New GarageBand Podcast
Launch GarageBand. If it immediately opens a pre-existing project, go ahead and click File > Close for that project so we can start fresh. If necessary, click File > New, then click the Create New Podcast Episode button. Once created, you should see the GarageBand interface, with Tracks labeled on the left, the Timeline in the middle, and Media Browser on the right.
Tutorial Tasks:
- For this tutorial, create a new podcast project called firstname_lastname_meyer_minute and click Create.
Import Main Content
If you didn’t already have a narration track, you could record it straight into GarageBand. Just plug in a mic, select the Male or Female vocal track, and click the red Record button. Hit the Spacebar to pause and click the Rec button again to continue from the playhead. You can overwrite what you’ve already recorded if you want, or leave all the editing until after you’ve recorded all of your narration. If you have different people talking, each person can record into a separate track. For simultaneous recording of multiple sources, just make sure that each track is associated with a microphone or sound input. This is done by clicking a track, and clicking Track > Show Track Info to access the info panel (usually in the bottom right of the screen). Select the correct input source and do an audio check to see if the audio levels meters light up for the track. If you have pre-recorded audio files for your main content, go ahead and drag them into one of the vocal tracks.
Tutorial Tasks:
- The recording of the narration track was already done for you, so you just need to drag meyer_minute_narration.mp3 from the Finder into the “Male Voice” track in GarageBand. That’s just a track name – it doesn’t actually have to be a male voice. In fact, double-click on the track name and rename it “Narration”. It is a good practice to rename tracks so you can stay organized as your project grows.
- For now, delete the “Female Voice” track for this project by clicking the track to highlight it, then clicking Track Menu > Delete Track. Go ahead and delete the Jingles track as well. We’ll add them back in later.
Edit Main Content
Now listen through the podcast and make notes about what parts you want to keep, and what parts need to be fixed or deleted. In order to delete a portion of an audio clip, you must first define the beginning and end of the piece to edit by splitting the clip. This is done by selecting the audio clip itself, setting the playhead at the split point, and clicking Edit Menu > Split. Then you can delete the pieces you no longer want, and rearrange the pieces you want to keep.
Tutorial Tasks:
- We’ve already marked out some suggested places to split the clip. Listen to the track and see if you agree! If you’re following along in the tutorial, don’t delete or rearrange anything in the Timeline until you’ve created all of the following edit points using the Edit > Split command. (By the way, we used the arrow keys to traverse along the Timeline in fixed 0.5 second increments for this tutorial. You can do this too by selecting a track and using the arrow keys.)
- min:sec and content description
- 00:00.000 Testing, testing… [DELETE]
- 00:06.500 Welcome to another…
- 00:09.500 I’m your host…
- 00:12.500 In today’s Meyer Minute…
- 00:18.000 Once shrouded in mystery…
- 00:26.000 At last, conscientious…
- 00:39.000 So without further ado…
- 00:46.000 Mondays to Thursdays…
- 01:02.000 So there you have it (flubbed)… [DELETE]
- 01:09.500 So there you have it (good take)…
- 01:22.000 The 2nd Floor… [REPLACE]
- 01:32.500 Okay, looks like…
- 01:40.500 Silence [DELETE]
- After splitting the clip, you should see various distinct chunks of audio in your timeline. Now deselect all of the clips and then use Edit > Delete and Move on the portions of the clip listed above that we want to delete. By using Delete and Move instead of just ”Edit > Delete”, you save yourself the trouble of needing to nudge each individual remaining audio clip to the left to fill in the void created by the deletion. If you’re having trouble selecting a single chunk of audio, try selecting another track first, then going back to click on the specific chunk in the narration track. When you’re done with this step, save your project.
- Listen through the whole thing again and make notes about remaining edits that need to happen. For example, some of the silent parts seem unnaturally long, so we will probably have to tweak it a bit. The Hours of Operation have changed since the original recording, so we’ll need to re-record that. Also, we’ll talk more below about what to do with that cheesy closing announcement.
Recording Content Using a Mic
If you plug in a USB microphone after GarageBand has already launched, it should auto-detect it and ask if you want to use this device.

You can also choose which recording device to use at any time by selecting the correct devices under GarageBand Menu > Preferences > Audio/MIDI tab > Audio Input.

When recording new audio, it’s a good idea to start a new track to hold the audio by clicking Track Menu > New Basic Track. This will create a new “No Effects” track that is ready to receive audio. If you want to record to an existing Real Instrument Track, select it and make sure the red Recording Enabled button is activated for the track. Set your playhead to the appropriate starting point, then click the large Record button at the bottom to start recording. Click the Record button again to stop. You should now see a purple clip. Check the quality of the recording and see if you need to record it again or perform other edits.
Tutorial Tasks:
- The Hours of Operation have changed since the narration track was first recorded. Delete the clip with the old hours and record the correct hours on a new track:Mondays to Thursdays: 9 AM to 12 midnight. Fridays: 9 AM to 5 PM. Saturdays: 1 PM to 5 PM. And finally, Sundays, 1 PM to 12 midnight.
- If you don’t have a microphone handy, you may download and import an MP3 recording of the new hours into your GB project.
- Play back your work from the start and adjust the timing of the clips if needed.
Add Music and Sound Effects
Technically a podcast doesn’t need a soundtrack or sound effects, but it sure tends to make it more interesting! Click Control > Show Loop Browser. To add in some background music (especially as lead-in and lead-out elements of your podcast), you can create your own original music using the techniques covered in the Music Composing in GarageBand tutorial or just check out the many free ready-to-use songs available if you search for “jingles” in the Loop Browser. And don’t forget that you can just drag in audio files from the Finder into an unused area of the Timeline. Just don’t overwrite the contents in your existing track!
Just like you added jingles and soundtracks, you can also add sound effects. We recommend starting a new track for each sound effect you want to insert into your podcast. You’ll find many sound effects to experiment with in the Loop Browser, under the Sound Effects category. Of course, you are not limited to the supplied sound effects and can import (or record) your own. Also, if you find that a particular clip is too long, remember that you can split it and delete portions of it.
GarageBand supports an automated feature called Ducking. When Ducking is enabled by selecting Control Menu > Ducking, every track is designated as either a foreground or background track. Whenever a foreground clip starts playing, all of the background clips playing simultaneously will reduce in volume. So if you have background music, and then narration in the foreground, you’ll notice that the music quickly fades in volume so you can hear the narration. Once the narration is over, the music volume will ramp back up. A track is considered a background track or a foreground track based on whether the yellow Up button or the blue Down button is selected.
However, while the Ducking feature is convenient, it tends to fade tracks up and down too abruptly for my tastes. Alternatively, you can exercise fine control of the volume by viewing the Automation info for the Track. Do this by clicking the 5th button below the Track’s name. (It looks like an upside-down triangle.) You should see a new row called Track Volume. Now you can add control points to the blue volume line. By dragging the blue control points around, you can create audio fade ins and fade outs. More information about this feature is available in the Music Composing in GarageBand tutorial.
Tutorial Tasks:
- For the tutorial, I selected the Yearbook Short tune from Jingles section and inserted it into a new track. Not only did I decide to move it all the way to the beginning of the podcast, but I decided I wanted the music to come in a little bit before the narration. So I had to select everything in the Narration track and drag it further right on the Timeline so that the music would come in loud first, then the narration would enter at about 00:05.000. Play the podcast from the beginning to judge if it sounds right. If you have Ducking enabled, you should notice its effect as soon as the narration track starts.
- Next, I decided I wanted a subtle clock ticking sound effect as I was saying “Meyer Minute”. The best one I could find by searching through the Loops Browser was something called Clock Wind Up. Add it as a new track in your project. Make the ticking sound start right around when I say “Meyer Minute” and Split and Delete any excess in the clip so it stops ticking after I start saying, “In today’s Meyer…”
- The contrived “Meyer Closing” announcement near the end is going to need some work to make it sound, well, less contrived. Delete the current version of the announcement and replace it by dragging meyer_minute_announcement.mp3 into a new track, roughly in the same position as the old announcement. Once you add a new track, you can rearrange their vertical display order by dragging the tracks by their name. For example, I dragged the announcement track to be immediately below the narration track so that I could line up the audio more easily.
- GarageBand provides a number of cool effects for enhancing the vocals. Double-click on the Announcement track and try some different vocal effects listed in the Track Info panel. I found the Female Rock Vocals effect to give me the most convincing echo effect to sound like an announcement made over the PA system.
- I added a number of other effects too, such as “Pulsing Sweep” when the host says “Once shrouded in mystery…”, “Cricket” sounds when he talks about not being open until midnight, and several overlapping instances of “Pulsing Logo Accent” to add some tension and drama to the otherwise very boring recitation of Meyer’s hours of operation. (I didn’t find a drum roll sound effect, so I found an alternative.) You should be able to find these same sound effects in the Loops browser by searching for the names. Feel free to experiment with other sound effects and jingles as well!
- Feel free to adjust the timing of the audio wherever you feel it’s appropriate. Sometimes the pauses between phrases and sound effects need to be tweaked to produce the perfect balance. This is a very subjective process, so just drag the audio clips around and see how it sounds. You can always use Edit Menu > Undo if you need to go back.
- The last step in this phase is to tweak the mixing of the audio tracks, especially the fade ins and fade outs. To do this, I carefully review each sound effect in context with the Track Volume graph open in the Timeline. That way I can gradually make sound effects fade out and prevent abrupt and distracting endings to sound effects and music.
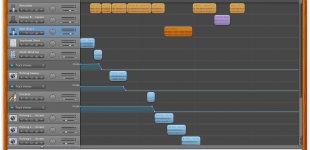
- For reference, feel free to compare your work with the finished sample called meyer_minute_done.mp3. You can also see a partial view of the sample work in the first screenshot at the top of this page.
Finalizing and Exporting
Give your podcast a final review to see if there are other ways to clean it up. Make sure the tiny purple End Marker is set near the actual end of your podcast. When you are satisfied with the results, it’s time to export your work. The easiest format to use for audio podcasts is MP3. (But the AAC must be used if you use enhanced podcast features, which are not covered in this tutorial.) Click Share > Export Song to Disk. Then select Compress Using: MP3 Encoder, and Audio Settings: Musical Podcast since it contains some background music. Click the Export button and specify a location to save it.

If you have trouble exporting your song as an MP3 from GarageBand, try exporting the MP3 file again with a short filename. Open up your new MP3 file in your player of choice to check it out. Congratulations! Now you just need a website to publish your podcast.
Next Steps
If you enjoyed this tutorial and don’t already have Apple iLife ’09, support my site by getting it and the accompanying Apple Training Series
book through here!